Coffee & Quinoa

  • Home
  • About
  • Recipes
  • Links
  • Contact
You are here: Home / Archives for Erica

Coconut Quinoa Banana Bread (Vegan)

February 15, 2013 by Erica

Coconut Quinoa Banana Bread (Vegan)

What’s that you say? Quinoa in my banana bread?

I know, it sounds weird.

Coconut Quinoa Banana Bread (Vegan)

Actually, I had never heard of quinoa banana bread until a funny thing started happening recently. Remember those funny search terms I posted about earlier in the week? Well, this was one of those! I began noticing that people searching for ‘vegan quinoa banana bread’ were landing on my vegan but non-quinoa banana bread recipe. Whatttt.

Being a search engine marketer, I understand why this is happening. I have a vegan banana bread recipe, and my blog name contains ‘quinoa,’ so Google thinks my site might be relevant. But of course, I don’t have what these people are looking for! And I decided that was wrong of me… even if I’ve never heard of quinoa banana bread. My blog does have quinoa in the title, after all, so I should probably incorporate it into a few more recipes :) Also, I was pretty curious to see how this might turn out! So I ran to the kitchen and whipped up this vegan coconut quinoa banana bread.

Coconut Quinoa Banana Bread (Vegan)

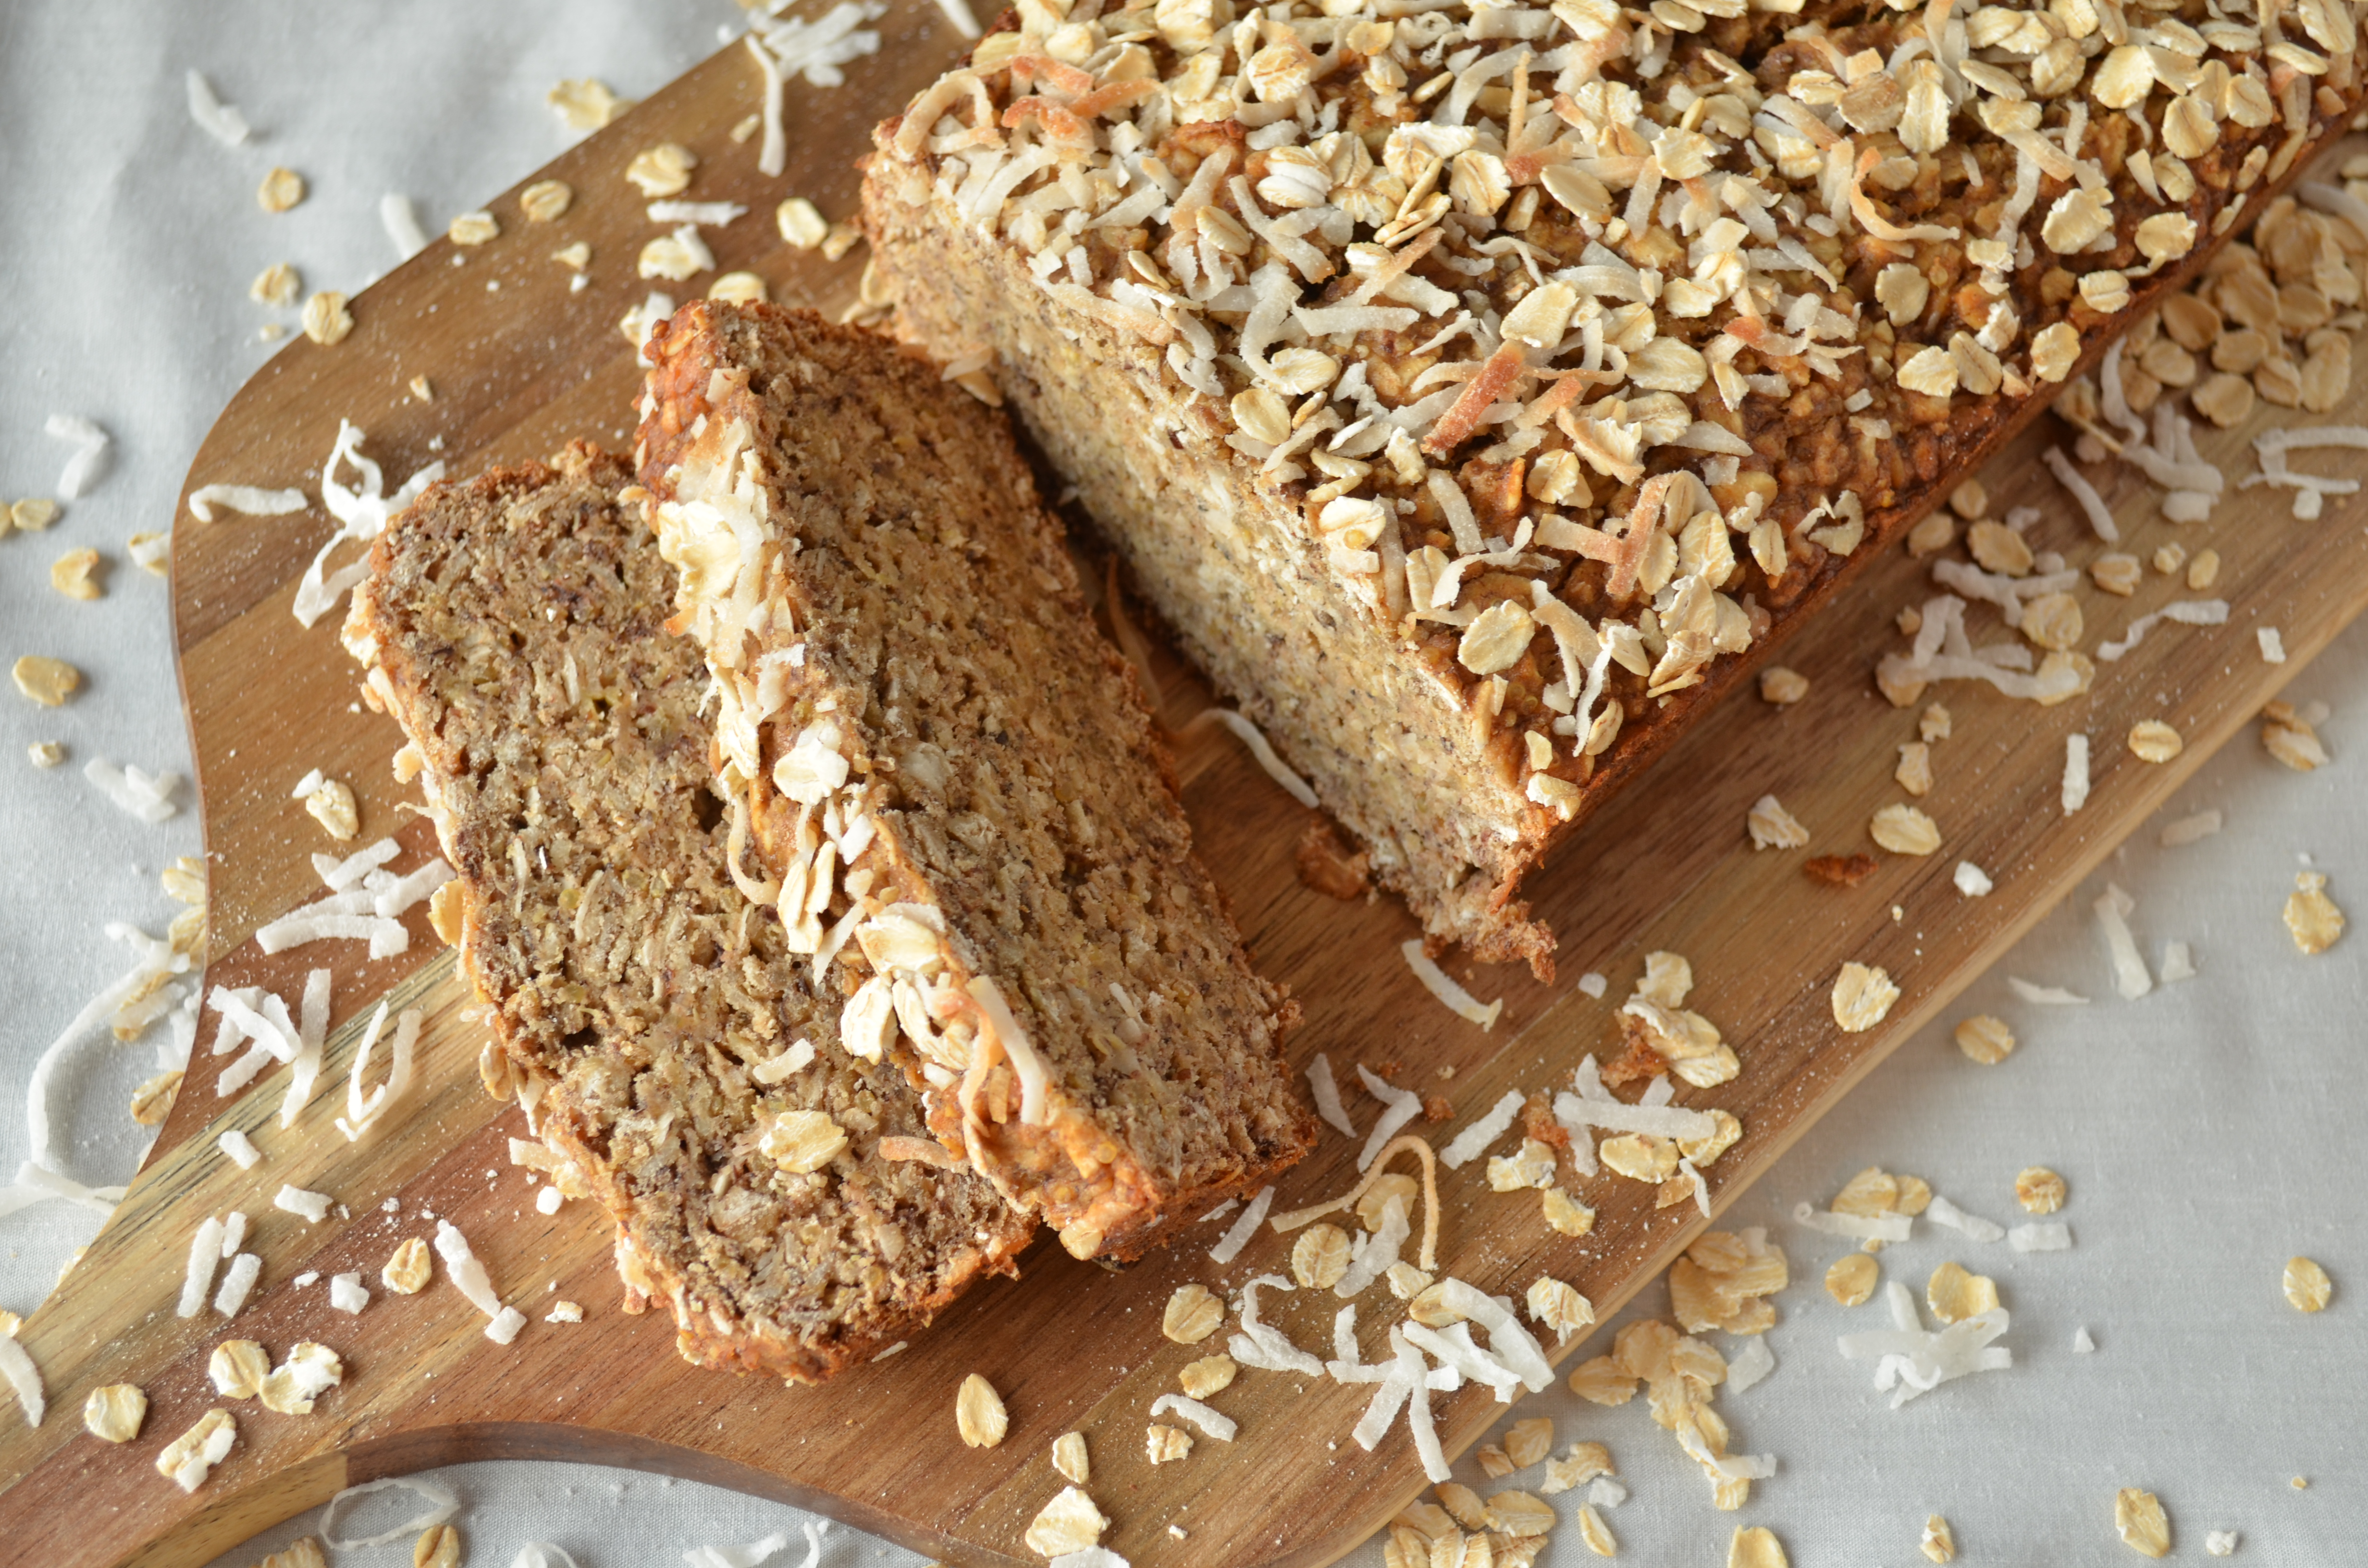
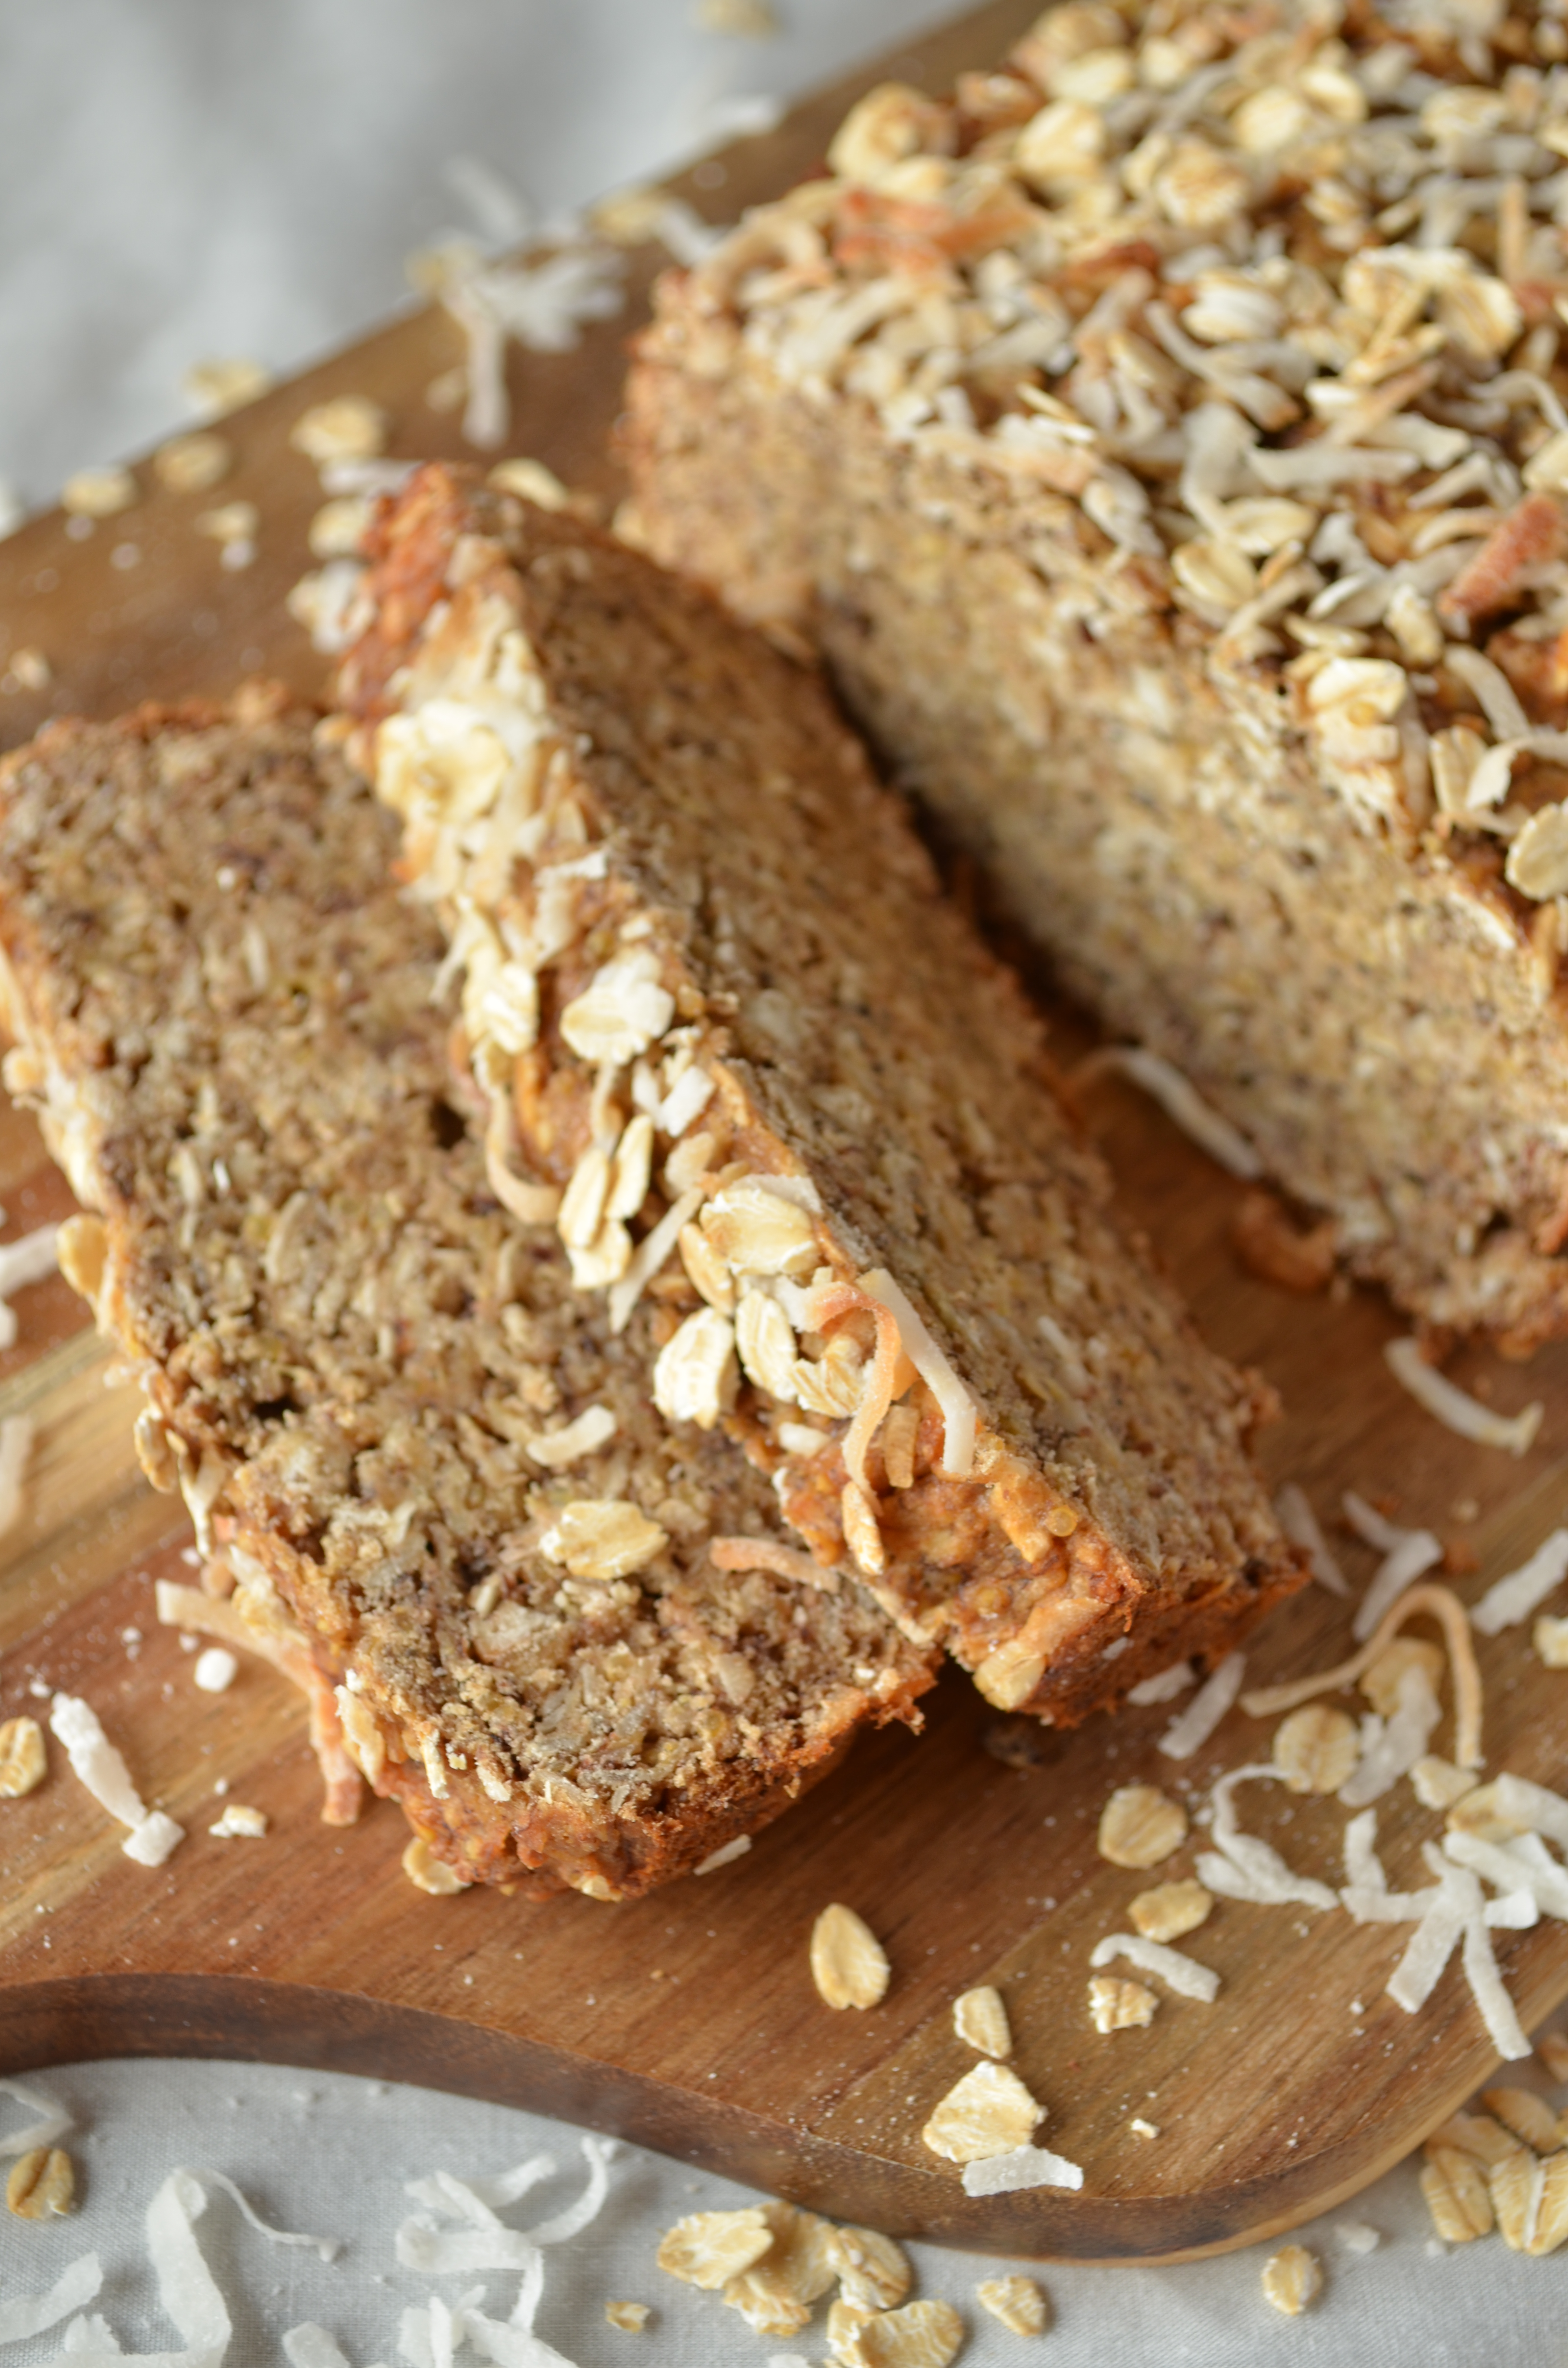
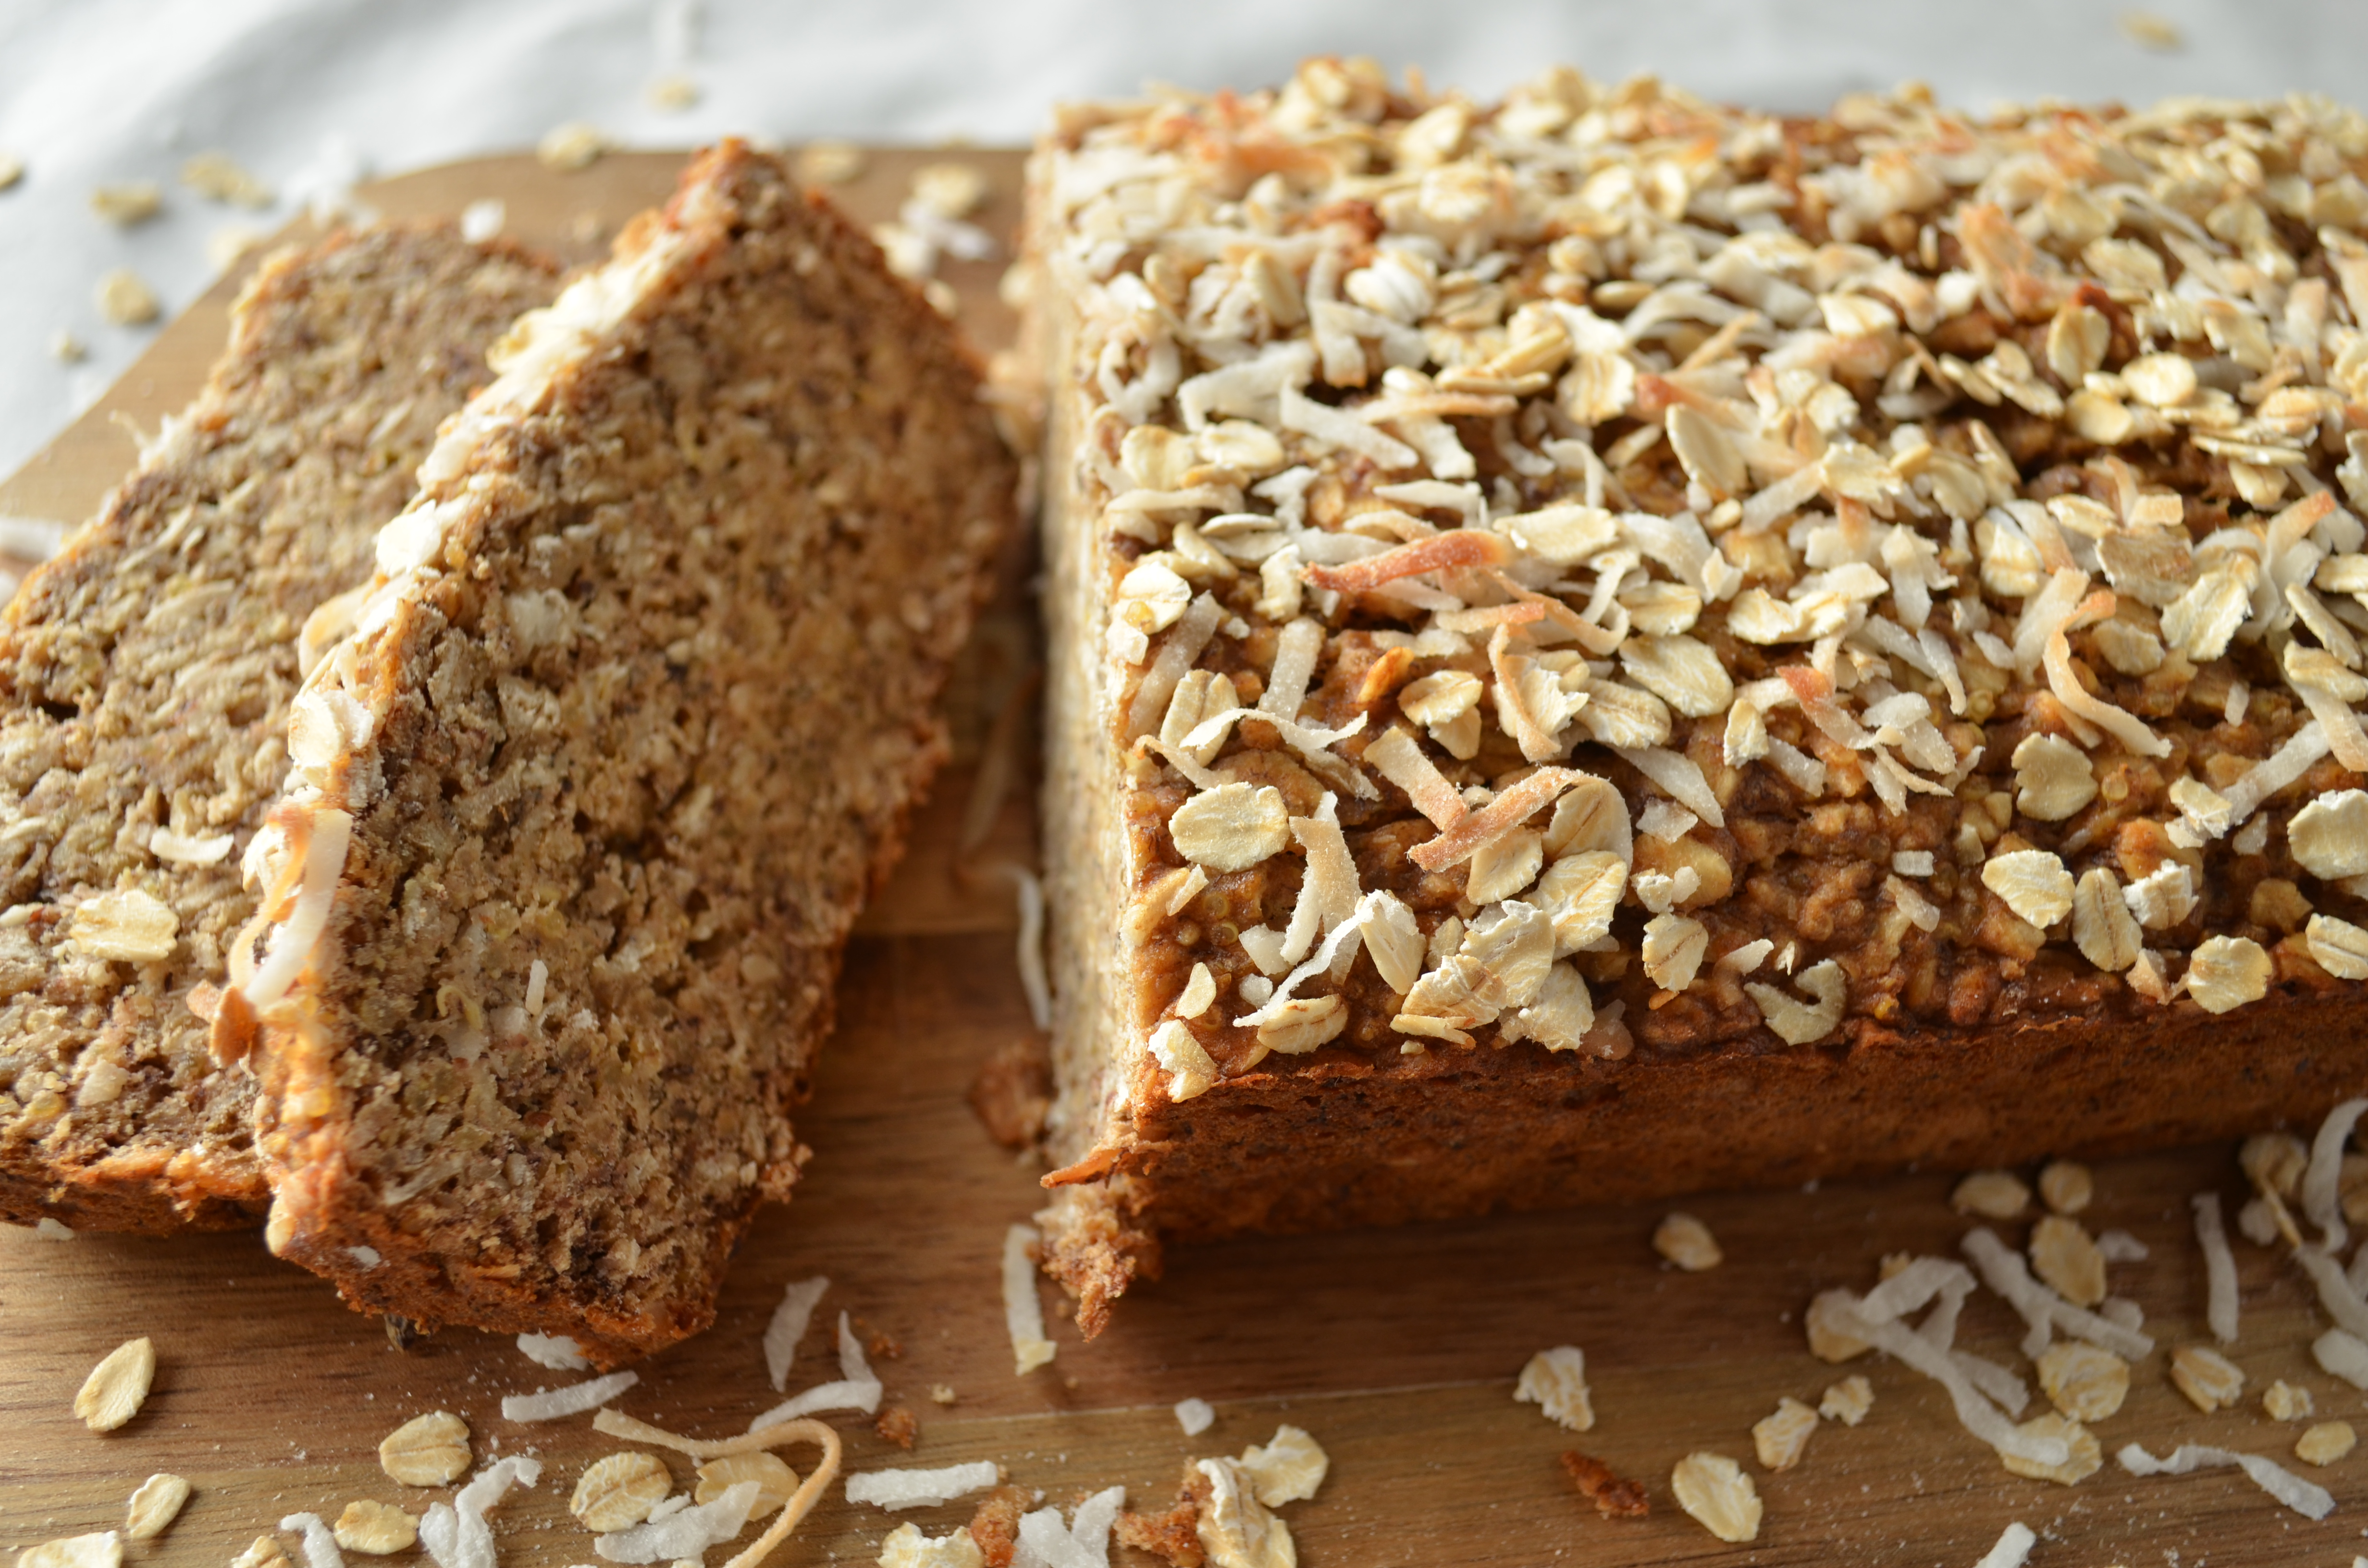
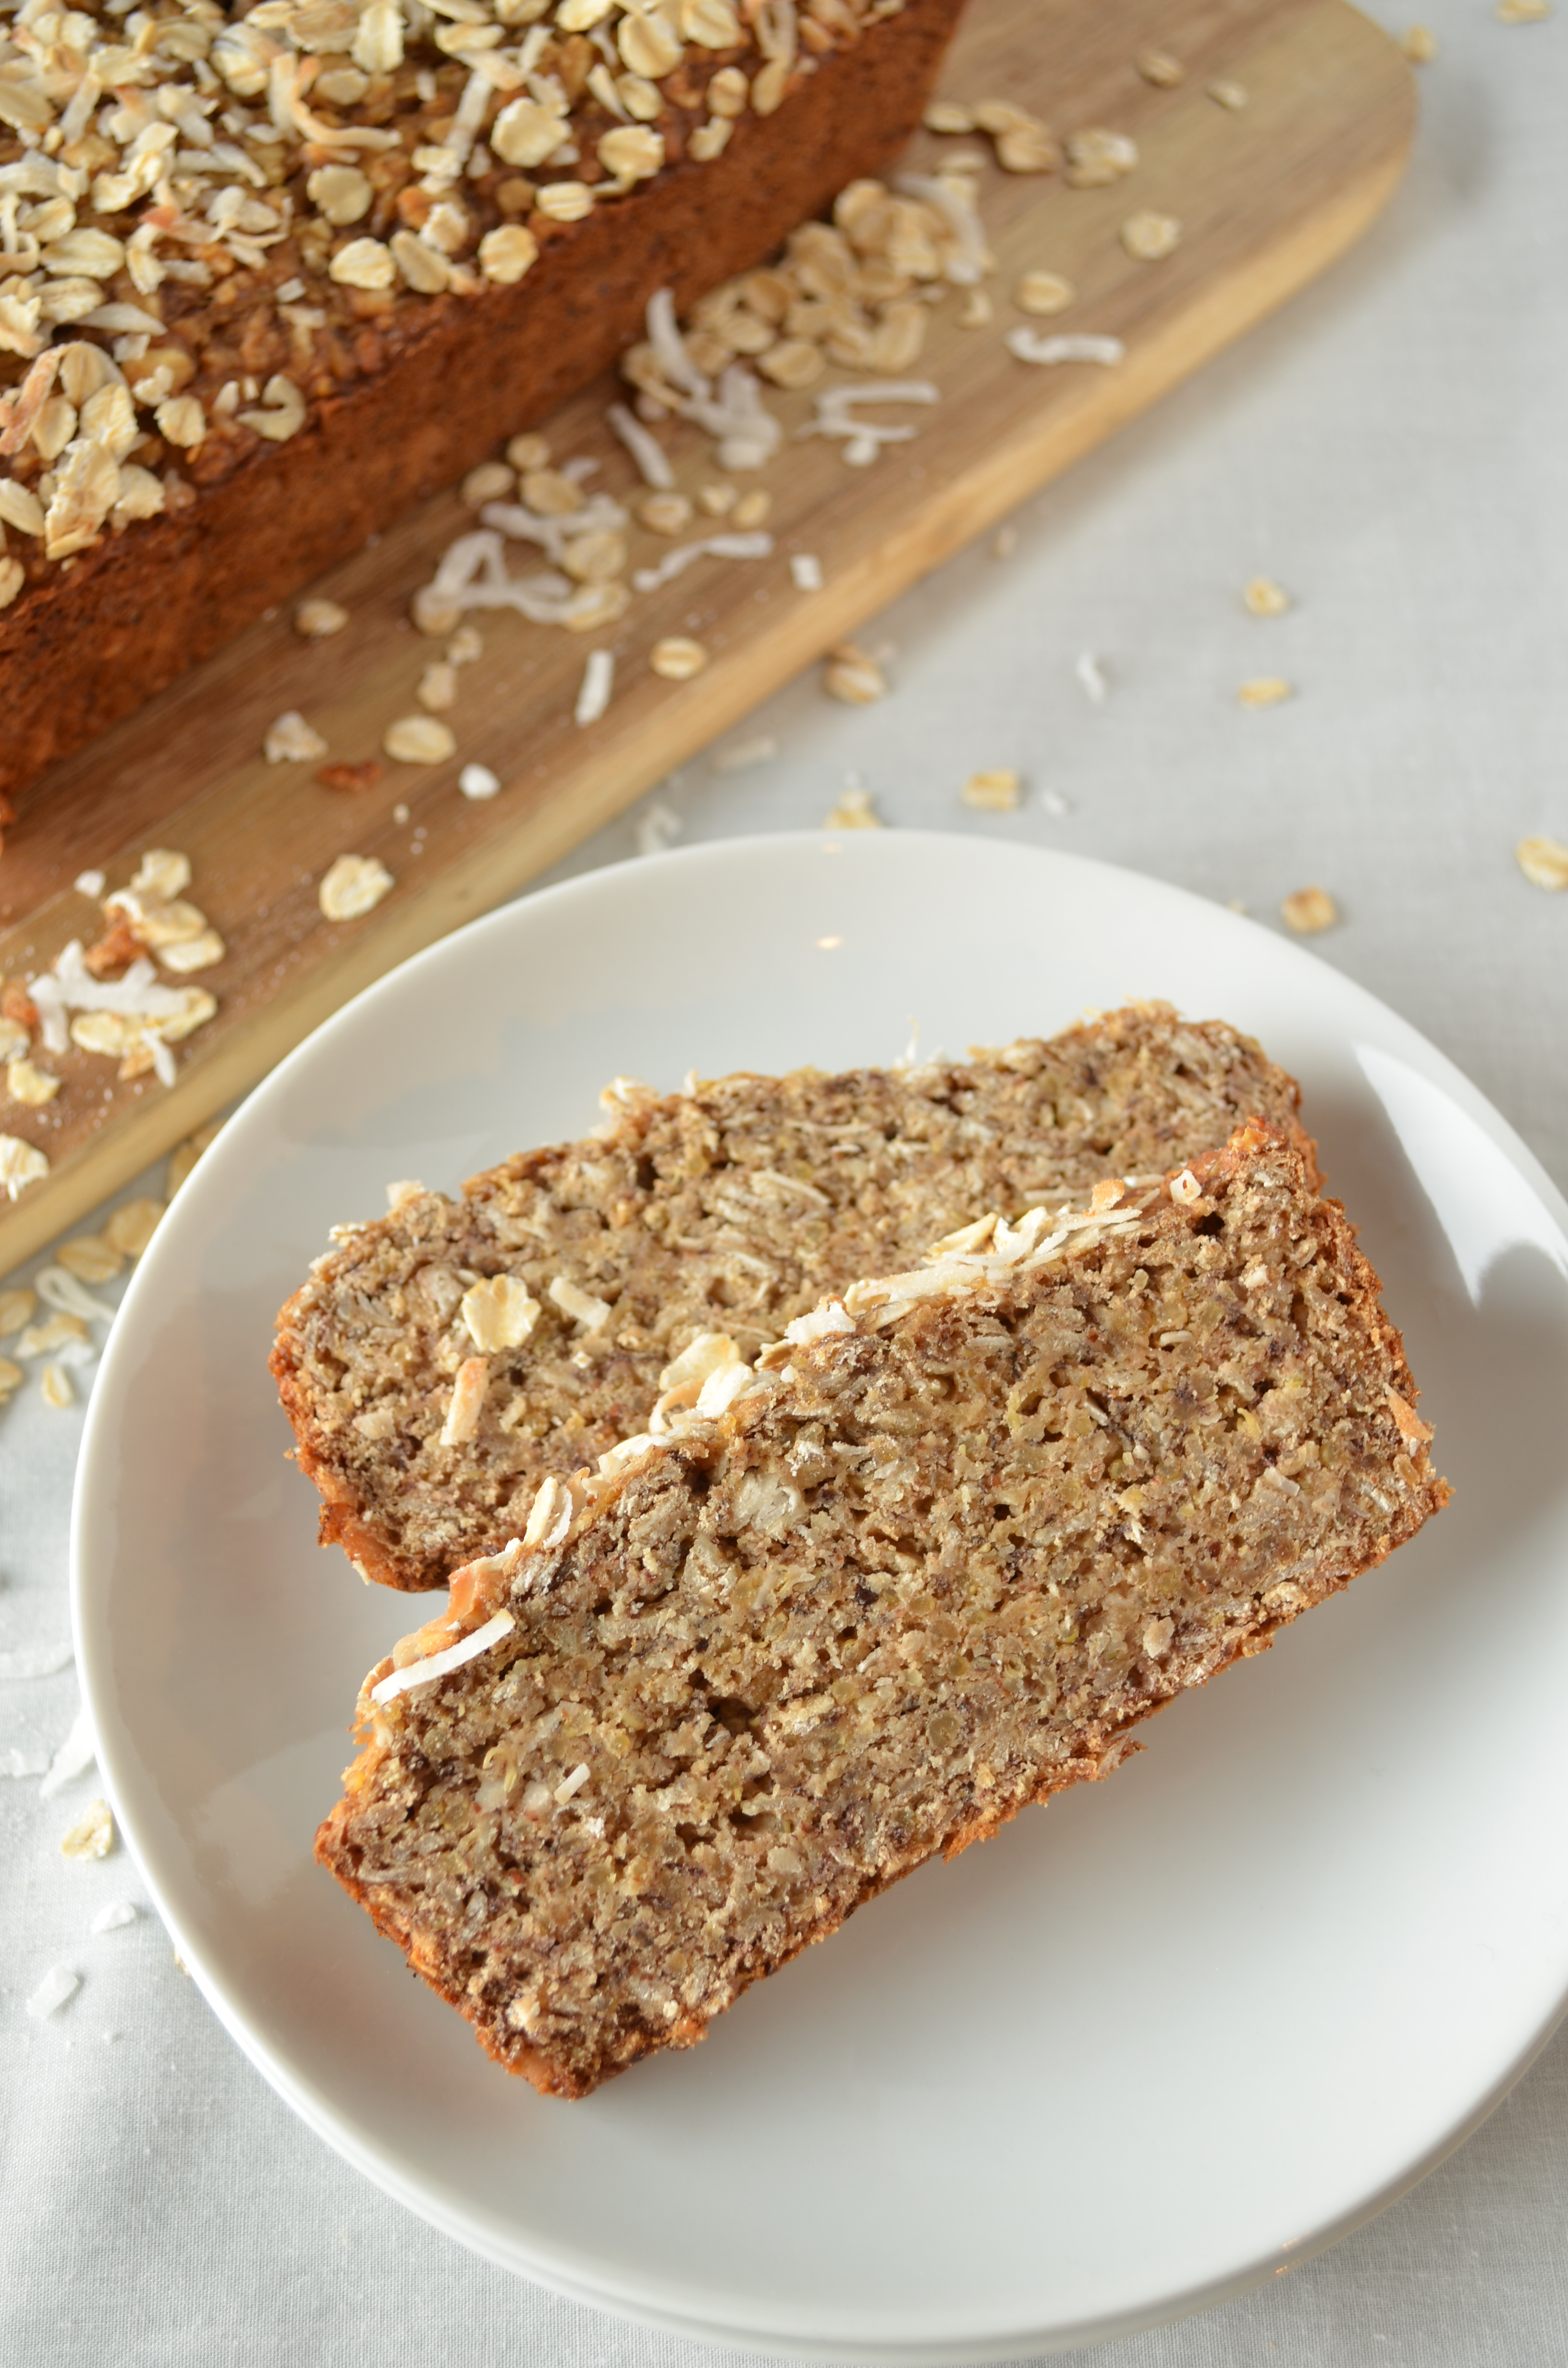
Last week, when I posted a beet cake, I told you right up front that you can taste the beets. That was my way of building credibility so that when I say you can’t taste the quinoa in this banana bread, you’ll believe me. Smart, right? But seriously! This banana bread has some great texture from the oats, shredded coconut, and quinoa, but it doesn’t have any odd quinoa flavor, which I personally feel (despite my love of quinoa) would be unwelcome in my banana bread.

Coconut Quinoa Banana Bread (Vegan)

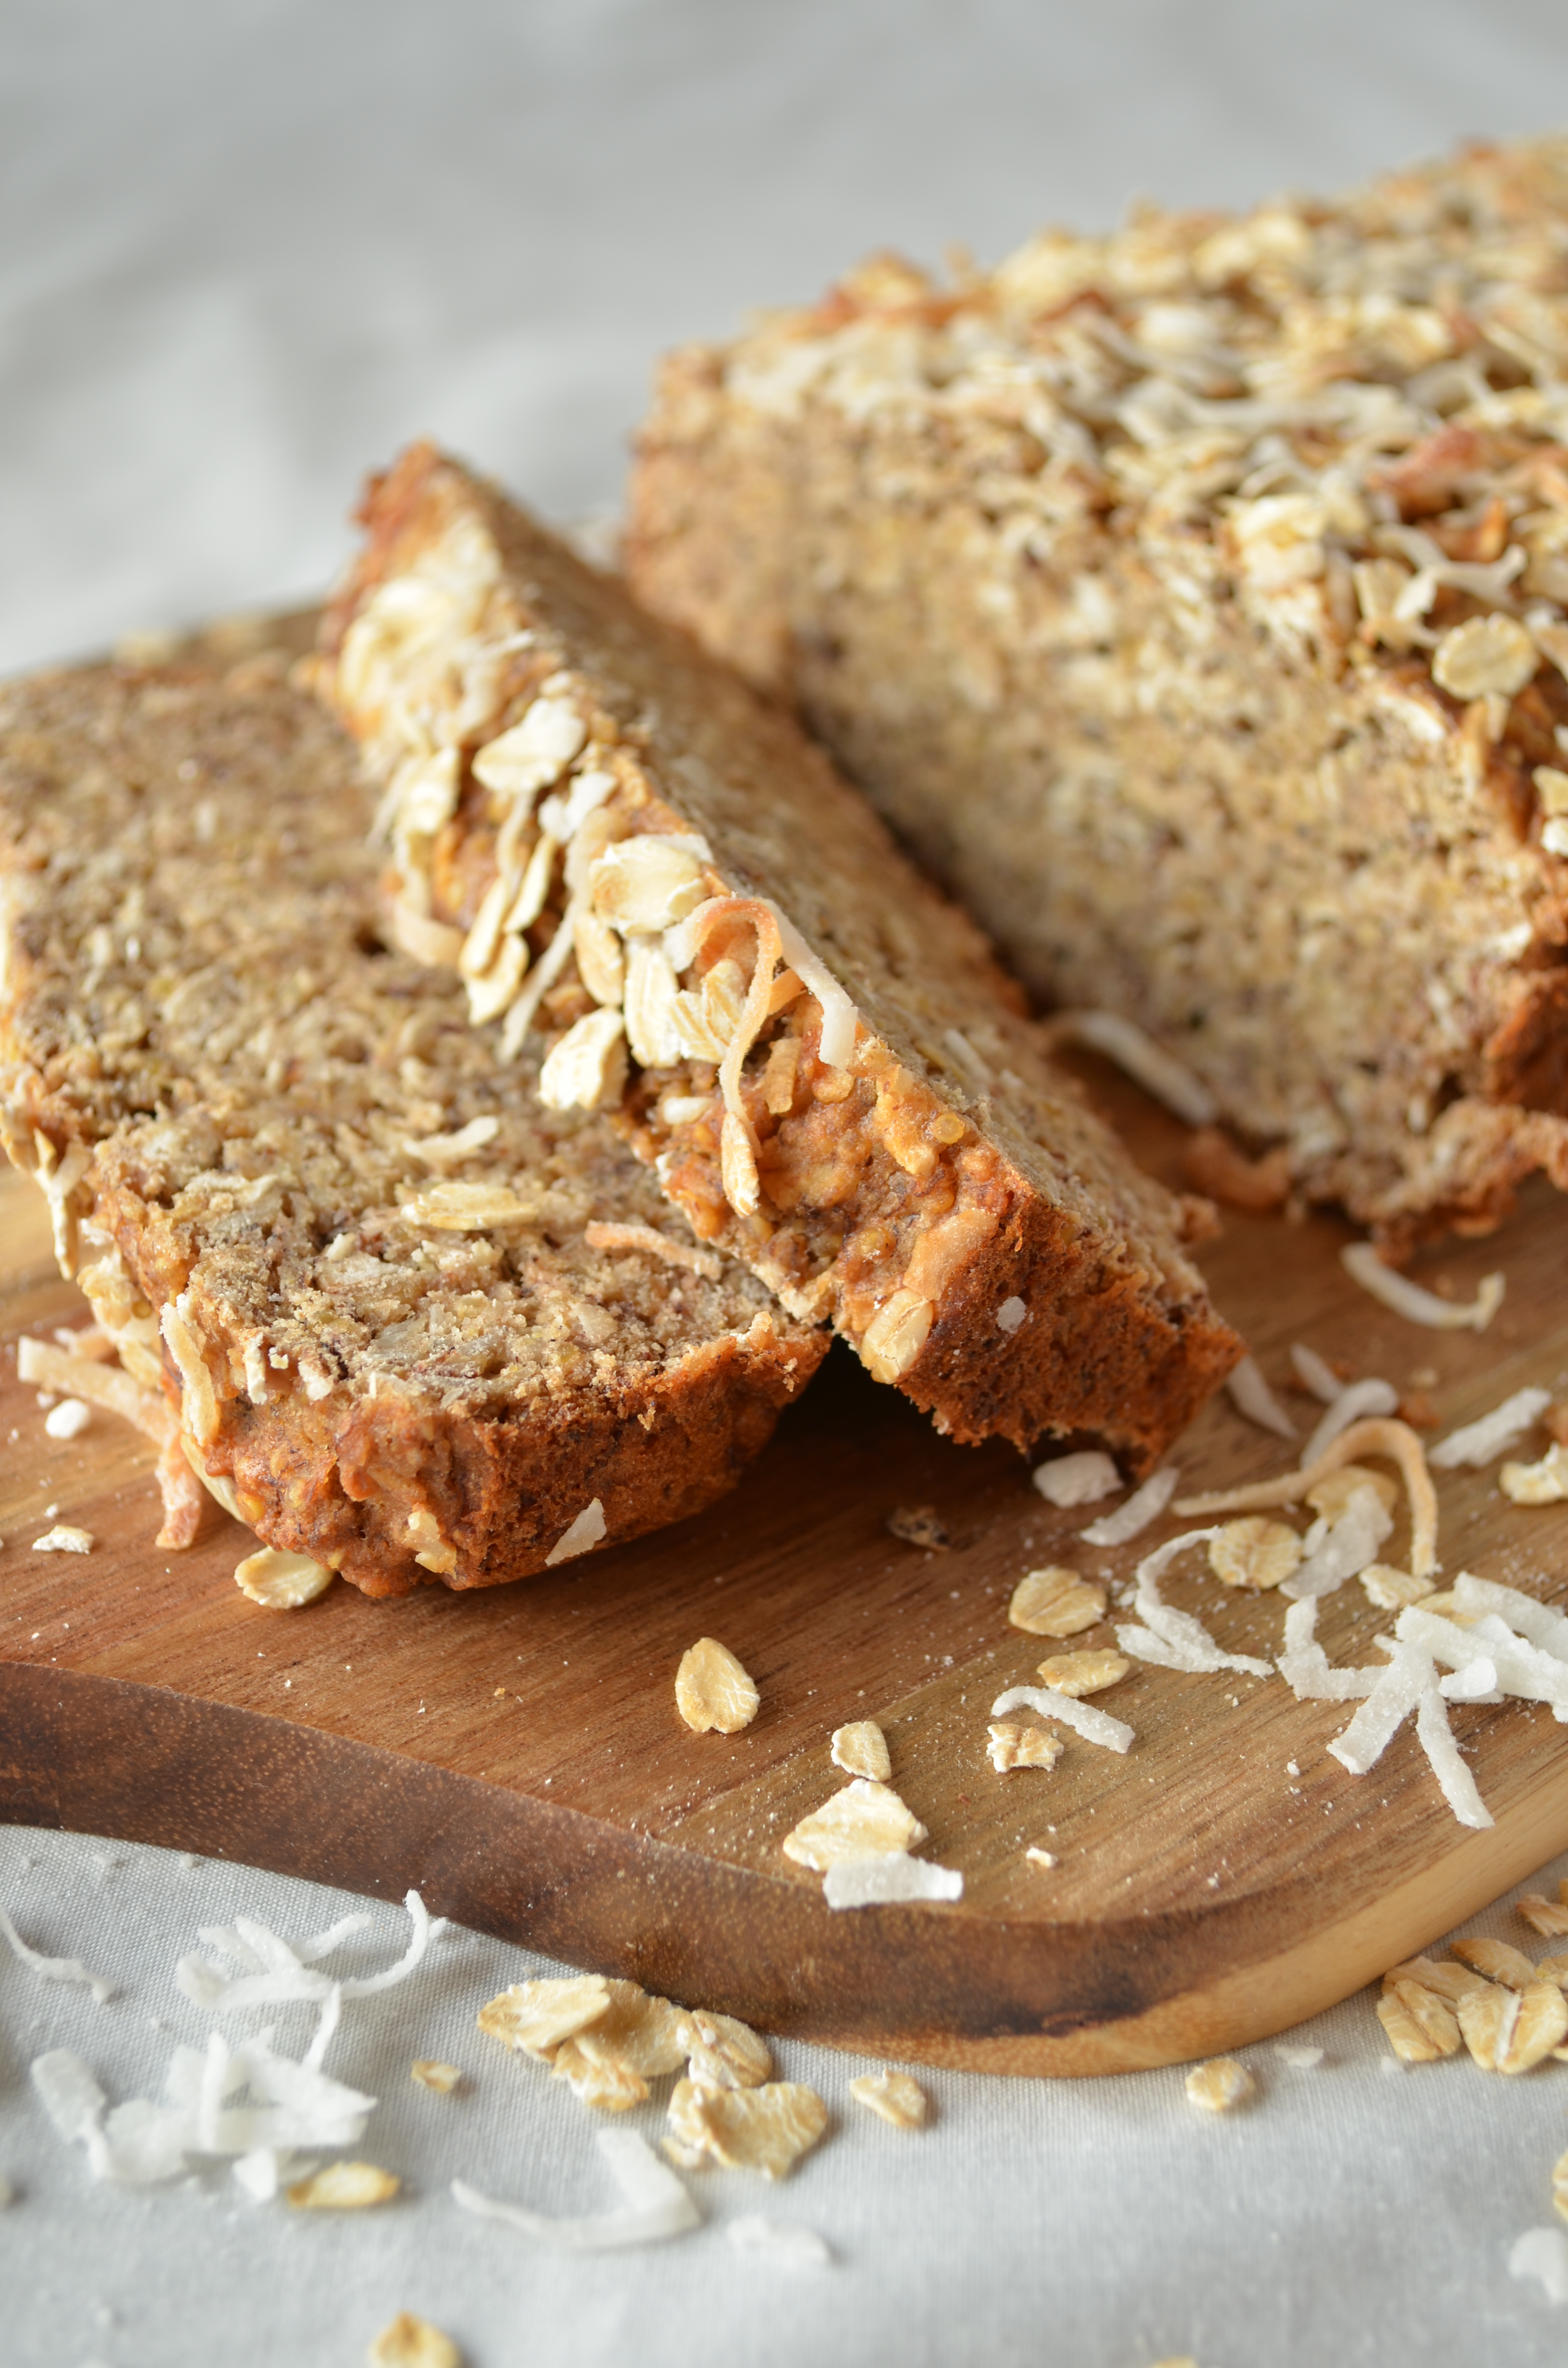
This is one dense and chewy banana bread, so be prepared. I love the nutty oats and shredded coconut in here, and the quinoa adds the chewy texture that I would usually add nuts and raisins to get. My favorite way to enjoy it is heated up and spread with coconut butter. Thank you, Google searchers of quinoa banana bread – you’ve turned me on to something great!

Coconut Quinoa Banana Bread (Vegan)

In my hunt for the perfect quinoa banana bread recipe, I did come across several that are made with quinoa flour or quinoa flakes. I haven’t tried one of those, because I had quinoa on hand, and was too lazy to go to the store just to buy an obscure ingredient. The Kitchn just posted an ingredient spotlight on quinoa flakes, so I’m curious. Have you ever made anything (especially banana bread) with quinoa flour or flakes? Next time I’m at Whole Foods, I may have to pick some up and develop a different banana bread recipe using one of those!

For now, enjoy this banana bread with coconut and whole quinoa grains. And have a great weekend!

Coconut Quinoa Banana Bread (Vegan)

4.7 from 7 reviews
Coconut Quinoa Banana Bread (Vegan)
 
Print
Hands-on time
25 mins
Cook time
50 mins
Total time
1 hour 15 mins
 
This dense banana bread is flecked with nutty oats and shredded coconut for texture. Cooked quinoa adds chewiness and whole grains. Enjoy it heated up and spread with coconut butter!
Author: Erica
Yields: 1 loaf (about 12 slices)
Ingredients
  • 1/2 cup uncooked quinoa (about 1 1/2 cups cooked)
  • 3 very ripe bananas
  • 1/4 cup coconut oil, melted
  • 1/4 cup maple syrup
  • 1 tsp vanilla extract
  • 1 cup all-purpose flour
  • 1 cup old-fashioned oats + another small handful for topping
  • 1 tsp baking soda
  • 1/4 tsp kosher salt
  • 1/2 cup sweetened shredded coconut + another small handful for topping
  • 2 Tbsp ground flaxseed
  • 1/4 cup coconut milk
Instructions
  1. Cook quinoa according to package directions. (I bring it to a boil with 3/4 cup of water, then simmer for 15 minutes and fluff with a fork, but I know some people prefer to use more water, probably depending on the stove.) Set aside.
  2. Preheat oven to 350 and lightly grease a loaf pan.
  3. In a large bowl, mash bananas with a fork. Stir in the coconut oil, maple syrup, and vanilla extract.
  4. In a medium-sized bowl, combine the flour, oats, baking soda, salt, shredded coconut, flaxseed, and cooked quinoa. Dump into the large bowl of wet ingredients and mix until thoroughly combined. Stir in the coconut milk.
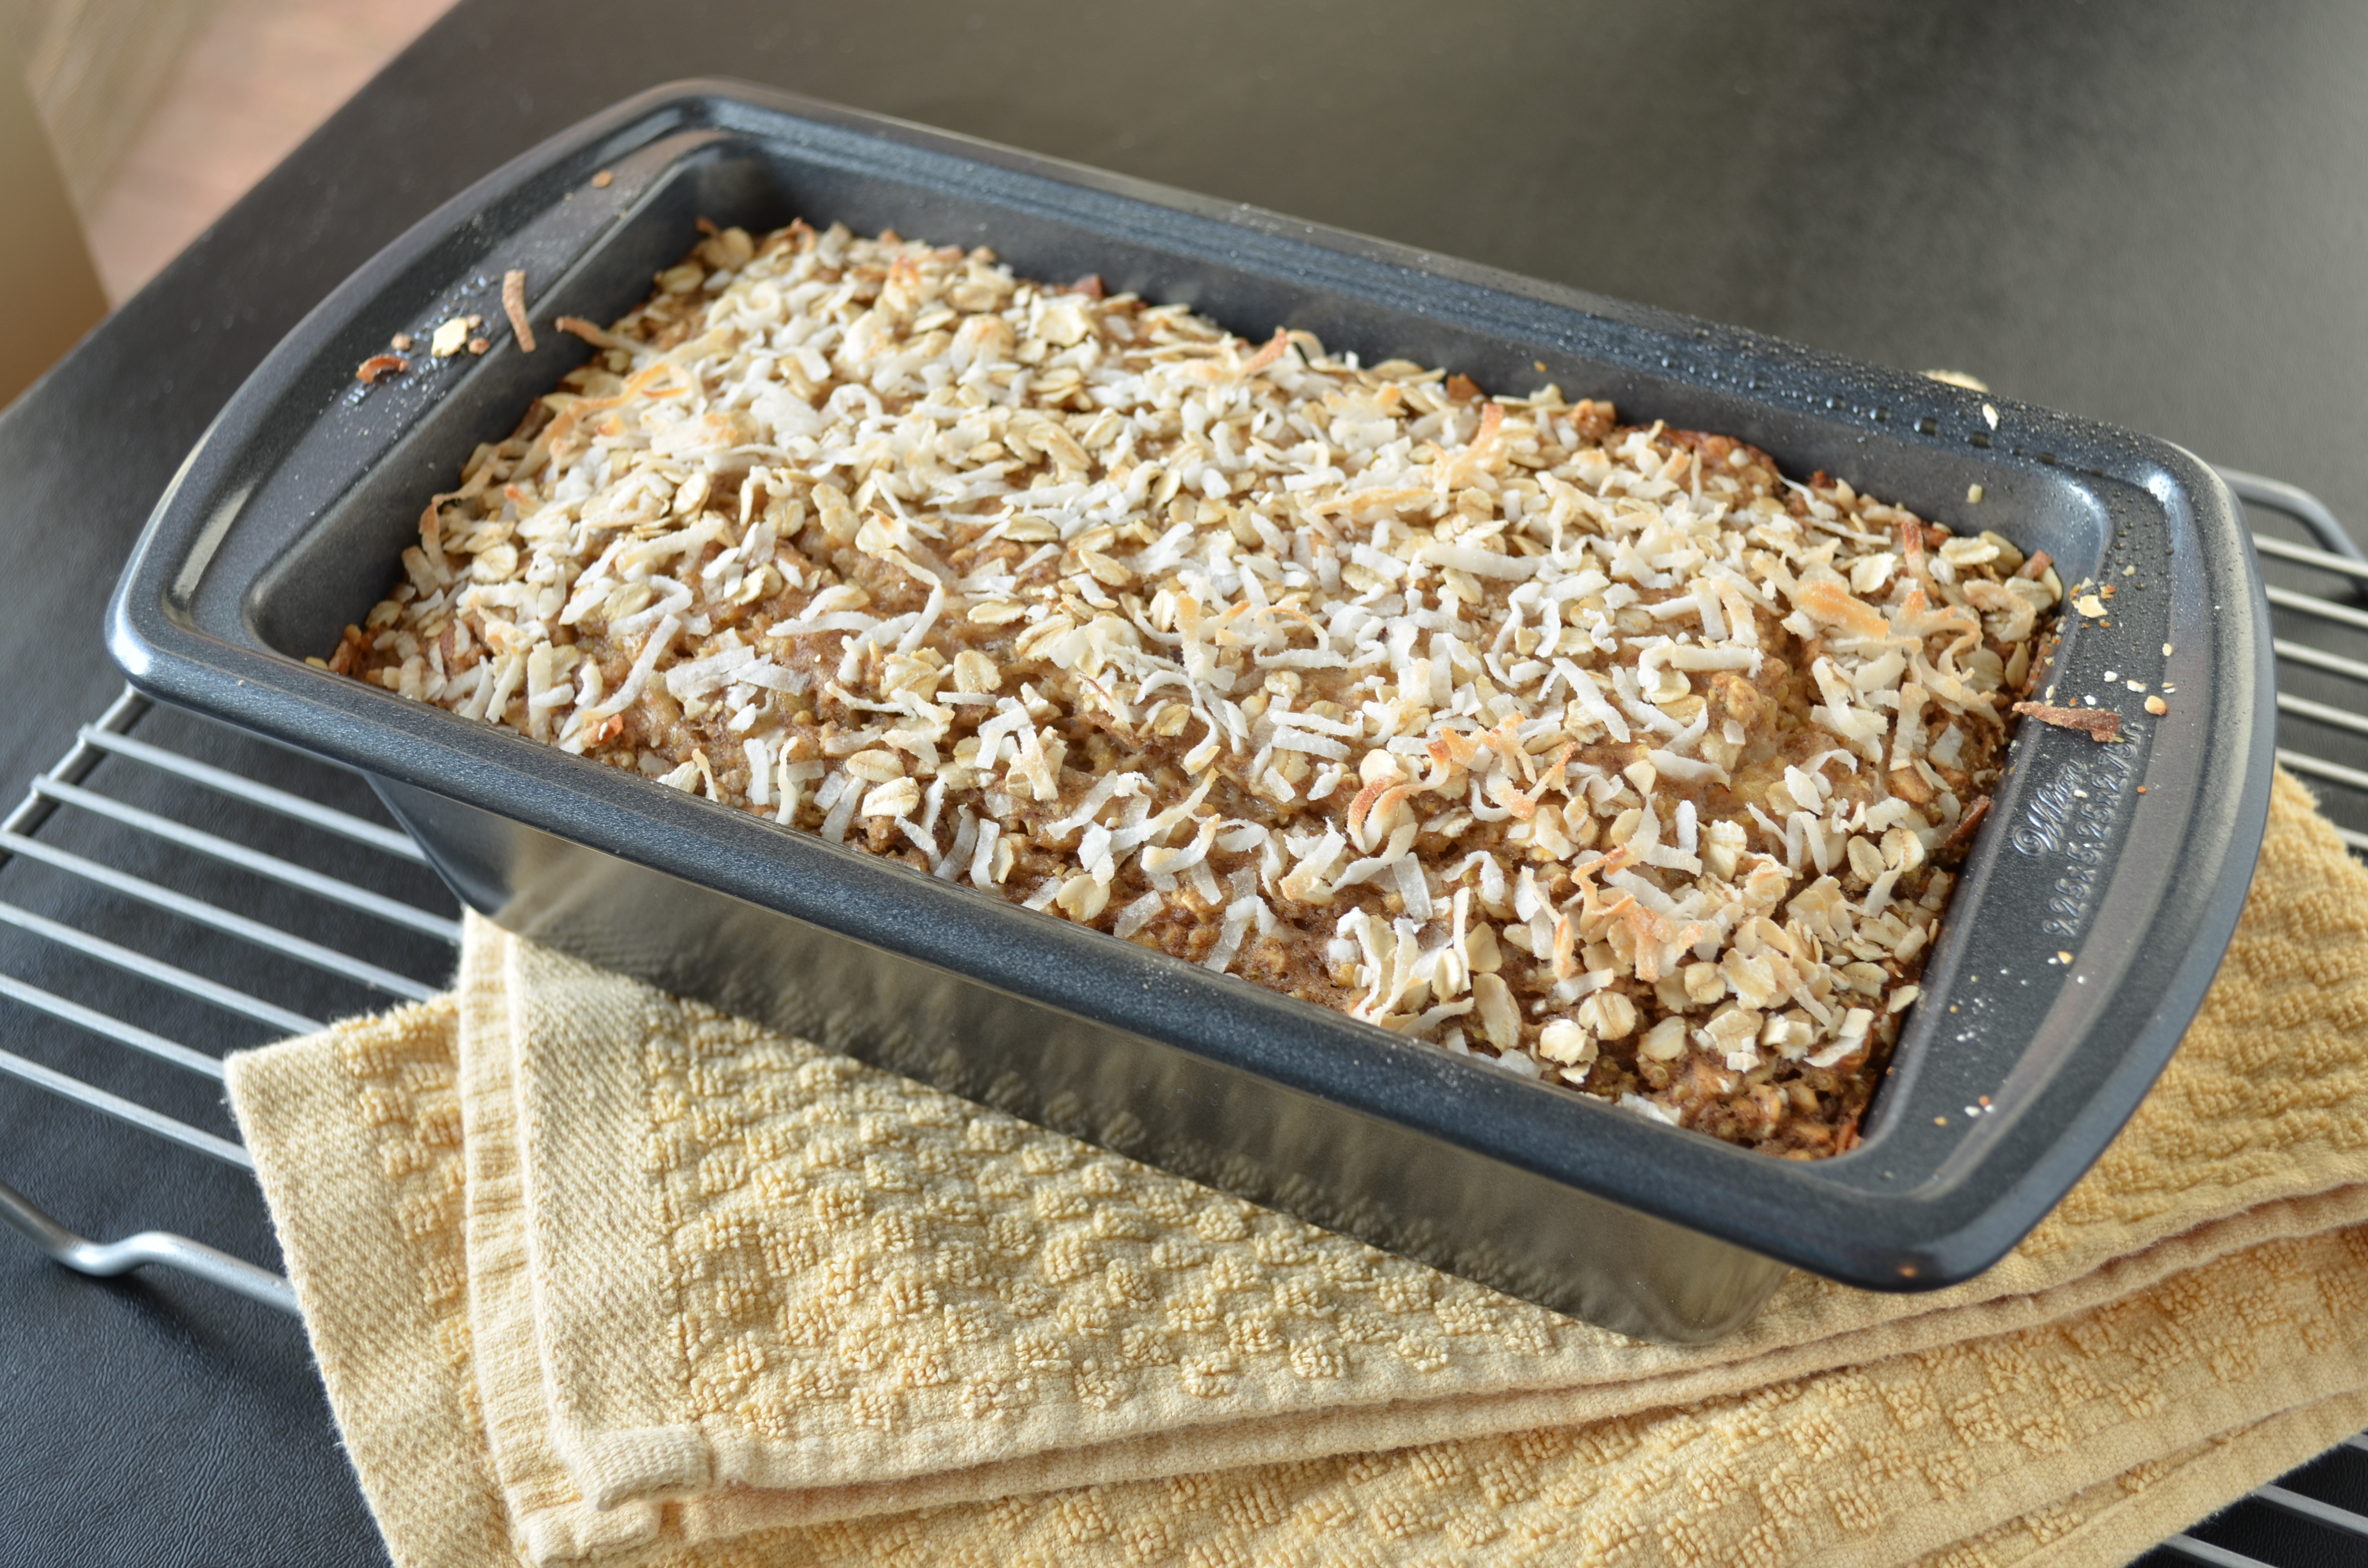
  5. Pour batter into prepared pan. Bake until top of loaf is golden brown and sides are pulled away from the pan, 45-50 minutes.
  6. Cool completely in the pan on a wire rack before serving. Keeps wrapped in tin foil in the fridge for several days.
3.2.1753


Filed Under: Quick Breads, Vegan Tagged With: bananas, bread, coconut, quinoa, vegan

Silky Dark Chocolate Truffles

February 13, 2013 by Erica

DSC_0327

A few years ago, I brought raw vegetables to a Valentine’s Day chocolate party. True story.

I’m not sure what I was thinking at the time… probably that I was too busy to bake something, and that there would already be a lot of chocolate there, anyway. As it turns out, I was right about all the other chocolate, and so the veggies  went over pretty well. But I certainly wasn’t going to win any awards for that dish. And even if I had baked something, all the desserts paled in comparison to the homemade truffles served by my friend Ellen, the hostess.

DSC_0296

My truffles here actually aren’t anything like the ones Ellen made that night, but that was the first time I’d heard of homemade truffles. Everyone kept asking Ellen how she made them, and she insisted it was easy! But I, for one, didn’t believe her.

Well, as it turns out, truffles are easy to make! But not all truffle recipes are created equal.

Silky Dark Chocolate Truffles | coffeeandquinoa.com

I found this out the hard way last year near Valentine’s Day, when I tried my hand at truffle-making for the first time. (That was pre-blog!) My truffles did not turn out that well. (I won’t link to the recipe I was using!) They tasted pretty good – umm, I challenge you to create a bad-tasting truffle – but the texture was grainy and for the life of me, I couldn’t get them round. So they turned out to be little piles of grainy chocolate with sprinkles on top. I mean, we ate them, obviously, but… meh.

So I was very pleased last week when I happened across the Cook’s Illustrated technique for making smooth, creamy truffles. Their method uses the following key steps:

– Microwave the chocolate before adding the cream so that you can stir the cream in, rather than whisking it in, which adds air bubbles and can cause a gritty texture.

– Add corn syrup and butter to smooth the texture of the chocolate.

– Cool the chocolate down gradually (for 2 hours at room temp, then in the fridge for 2 hours) to avoid grainy crystals.

Yes please! Problem solved.

Silky Dark Chocolate Truffles | coffeeandquinoa.com Silky Dark Chocolate Truffles | coffeeandquinoa.com Silky Dark Chocolate Truffles | coffeeandquinoa.com Silky Dark Chocolate Truffles | coffeeandquinoa.com

 Silky Dark Chocolate Truffles | coffeeandquinoa.com

DSC_0284

I started with the Cook’s Illustrated recipe, and from there, being me, I wanted to try out as many different toppings as possible. (My “more is more” mentality.) I rolled some of the truffles in cocoa powder, others in ground hazelnuts, a third batch in coconut, and finally dipped the rest in melted chocolate bark (my new best friend!) and topped them with a sprinkle of pink Himalayan sea salt.

DSC_0280

Can you guess which were our favorites? That would be the chocolate-covered truffles, of course.

DSC_0302

The sea salt does it for me every time, and the crunchy chocolate coating made them seem very professionally made. Yum! I’ll give the recipe for the chocolate-covered ones below. The rest were also delicious, though, and I highly encourage you to try whichever coating sounds best to you!

I know this is a Valentine’s Day post, and my blog should be exploding with red and pink sprinkles, napkins, hearts, and so on right now. But sometimes (and especially on Valentine’s Day), chocolate is the most beautiful color.

DSC_0328

Silky Dark Chocolate Truffles

Makes 64 small truffles

Adapted from Cook’s Illustrated

Ingredients:

For the truffles:

6 oz bittersweet chocolate (I used Ghirardelli 60% cacao), roughly chopped

6 oz semi-sweet chocolate (I used Ghirardelli semi-sweet), roughly chopped

1/2 cup heavy cream

2 Tbsp light corn syrup

1/2 tsp vanilla extract

pinch kosher salt

1 1/2 Tbsp unsalted butter, cut into 8 pieces and softened

For the coating:

20 oz chocolate bark

sea salt for sprinkling

Instructions:

Take a look at my notes in the blog post above on the key techniques in this recipe.

Spray an 8-inch square baking dish with cooking spray. Line with 2 sheets of parchment paper, perpendicular to each other to form a cross, and spray the parchment paper with cooking spray.

Microwave chocolate in a heat-proof dish until melted and no chunks remain, stopping to stir every 30 seconds. Set aside.

Microwave cream (separately) until warm to the touch, 30-45 seconds. Stir corn syrup, vanilla, and salt into cream. Pour mixture over chocolate. Cover with plastic wrap and allow to sit for 3 minutes, then stir (with a spoon, not a whisk!) until thoroughly combined.

Stir in butter, one piece at a time, until thoroughly incorporated.

Spread the chocolate mixture into the prepared baking dish. Allow to sit (uncovered) at room temperature for 2 hours. Then cover and transfer to the fridge to cool for at least another 2 hours, or up to overnight. (I did overnight.)

After truffles have cooled for the allotted amount of time, remove from the refrigerator. Using the parchment paper, pull the layer of chocolate out of the baking dish. Run a sharp knife under hot water, and cut the square of chocolate into 64 squares (8 rows by 8 rows). Coat palms lightly in cocoa powder and roll each square into a ball. You may find that about halfway through, the chocolate is too warm to roll into balls. In this case, refrigerate the remaining squares for 5-10 minutes, then continue.

Now you are ready to coat the truffles. If coating in sprinkles, nuts, cocoa powder, etc. instead of melted chocolate, simply roll each truffle in your hands for a few seconds to warm it and make the outside stickier, then roll in the desired coating. If coating in chocolate bark, microwave chocolate bark in 30-second increments, stirring in between, until melted. Roll each truffle around in the chocolate bark, using a fork, until thoroughly coated. Set on a plate or baking sheet and sprinkle with a pinch of sea salt. Drag a toothpick around the bottom of the truffle to cut off the chocolate “foot” that might develop as some of the chocolate coating slides down the truffle. This will make that easy to break off, leaving you with round truffles, rather than round truffles sitting in pools of hardened chocolate. Chocolate bark should harden within several minutes, at which point you should definitely sample one, and then return the rest to the refrigerator for another 2 hours.

These truffles are best stored in an airtight container in the refrigerator. Allow to sit at room temperature for 5 minutes or so before serving.

Enjoy, and happy Valentine’s Day (tomorrow)!

Time:

7 hours (1 hour active time)

Filed Under: Candy Tagged With: chocolate, truffles, valentine's day

Funny Blog Keywords

February 12, 2013 by Erica

Funny Search Terms | coffeeandquinoa.com

I was just looking back through my recent Analytics data, and chuckled to myself over some of the funny and random search terms that landed users on my blog. I couldn’t help but share with you. Dear searchers for the following things, I don’t think I have what you’re looking for:

– cheese that looks like chocolate

– chocolate from goat

– cobwebs in quinoa

– coffee flavored quinoa

– girl scout cookies political correctness

– his and hers simple wedding cakes with blue

– how to harvest quinoa in the fall

– i got you a goat but

– quinoa adapting

– who is the author of garlic coffee

– yoga cakes

And my personal favorite:

– what to call a girl when they call you peanut

I get lots of random searches for quinoa that land on my site. (More on that later in the week!) Do you see any patterns like that in search terms for your blog? Any funny ones?

Filed Under: Blogging, Misc. Tagged With: blogging, keywords

Thai Coconut Lentils with Kale

February 11, 2013 by Erica

Thai Coconut Lentils with Kale | coffeeandquinoa.com

Let’s talk lentils.

Just by talking about them, I think we’re getting the week off to a healthier start than we otherwise would. Don’t you?

It is, of course, the week of Valentine’s Day, so I have a hunch we’re all going to be eating our fair share of chocolate over the next few days. It can’t hurt to eat some green stuff now, before the Hershey’s kisses and Ferrero Rochers set in. (Mmmm Ferrero Rochers.)

Thai Coconut Lentils with Kale | coffeeandquinoa.com

Lentils are one of my favorite bases for a quick and healthy meal. They’re filling yet light, chock full of protein, take on pretty much any flavor you want, and taste great with lots of veggies. Lindsay from Pinch of Yum is in love with lentils too, and her lentil creations are some of my favorites. A little while ago I was craving some gingery lentils, and this is the dish I came up with.

Thai Coconut Lentils with Kale | coffeeandquinoa.com

This is a great weeknight meal, and to make it even quicker, you can cook your lentils ahead of time. (I usually do this the night before, or in the morning while I’m showering and getting ready.) Everything comes together very quickly once the lentils are cooked, so you can have dinner on the table in 15 minutes if you plan ahead! Now that is a great start to the week.

Thai Coconut Lentils with Kale | coffeeandquinoa.com


Thai Coconut Lentils with Kale

Serves 3-4

Ingredients:

1 cup dried green or brown lentils

1 Tbsp coconut oil

2 Tbsp tom ka paste (spicy coconut paste, found in Asian markets)

2 small cloves garlic, minced

2 Tbsp minced or grated ginger

6 green onions, sliced, divided

1 14-oz can lite coconut milk

1 bunch curly kale, rinsed and torn into bite-sized pieces

Instructions:

Cook lentils according to package directions. (I like to bring mine to a boil with 1 1/2 cups water, simmer for 40 minutes, then drain excess water.) This can also be done ahead of time.

Heat coconut oil in a large pan or skillet over medium heat. Once melted, mash the tom ka paste into the coconut oil. Stir in the minced garlic and ginger and half of the sliced green onions. Saute until fragrant, about 30 seconds to a minute. Stir in the coconut milk and heat through. Once hot, add the kale and cooked lentils. Continue sauteing, stirring frequently, until kale leaves are softened and bright green.

Serve immediately, topped with remaining green onions. Enjoy!

Time:

50 minutes (15 minutes if the lentils are already cooked)

Filed Under: Main Dishes, Vegan, Vegetarian Tagged With: coconut, kale, lentils, thai

Better Than Tagalongs (or Peanut Butter Patties)

February 8, 2013 by Erica

Better Than Tagalongs (or Peanut Butter Patties) | coffeeandquinoa.com

You guyssss. It’s coming up on that time of year again. The time that we all look forward to, without wanting to admit we’re looking forward to it.

Girl Scout cookie time!!!!

Better Than Tagalongs (or Peanut Butter Patties) | coffeeandquinoa.com

Except this year I couldn’t wait.

And that’s how I made this dangerous discovery: That you can have homemade Girl Scout cookies year round.

Better Than Tagalongs (or Peanut Butter Patties) | coffeeandquinoa.com

I blame this on my friend Jacquey.

Jacquey brought these over a few weeks ago when we were watching The Bachelor. I assume she was doing the same thing I do when I bring treats into work – getting them out of her house so she wouldn’t eat them all. Maybe not. Jacquey is fabulous, has lots of self control, and would probably never eat a cookie with her breakfast just because it was there.

Better Than Tagalongs (or Peanut Butter Patties) | coffeeandquinoa.com

Anyway, it worked. I ate them all instead. Then I made several more batches, and ate those too. Thanks a lot, Jacquelyn.

These are like crack to me. They are just like tagalongs/peanut butter patties, but better. Better because they are bigger… they basically have twice as much of everything in one cookie.

Better Than Tagalongs (or Peanut Butter Patties) } coffeeandquinoa.com

Side note: Did you call these tagalongs or peanut butter patties growing up? They were definitely peanut butter patties in New England, but I’m now smack in the middle of tagalong country. That was pretty weird for me last year when I went to buy Girl Scout cookies here for the first time, but I think I’m OK with it now. A rose by any other name…

Well, whatever you call these, they have always been my faaaavorite Girl Scout cookie. Sure, I like thin mints. I might even make some of those soon. But the peanut butter patty, despite its unsexy name, just can’t be beat for me. Thinking back to my childhood Girl Scout cookie obsession, the only bummer was that there were so few peanut butter patties in a box. Remember that?! Thin mints came in sleeves of like 18, with multiple sleeves per box, and I’m pretty sure that each box of peanut butter patties only contained 12. Same price. So unfair. The thin mint was definitely the best bang for your buck.

Better Than Tagalongs (or Peanut Butter Patties) } coffeeandquinoa.com

Once again… enter the homemade peanut butter patty. No more feeling like you should have bought thin mints so you could get 3x as many cookies. Now you just need an extra jar of peanut butter and you are good. to. go.

Better Than Tagalongs (or Peanut Butter Patties) } coffeeandquinoa.com

These cookies, believe it or not, are super easy to make, and have only 3 ingredients (plus an optional garnish). But it’s worth saying a few words about the ingredients you use here:

Think like you were Brownie age again, instead of the incredible health-conscious home chef you are today. That means no homemade gluten-free crackers, no all-natural peanut butter, no high-quality dark chocolate. Straight up Ritz crackers, Skippy, and chocolate bark.

Better Than Tagalongs (or Peanut Butter Patties) } coffeeandquinoa.com

Embrace it. They are better this way, trust me.

I made two other versions of these, one with milk chocolate chips and one with dark chocolate. They didn’t even come close to the chocolate bark version. Chocolate bark doesn’t taste great when it’s melted (it’s very sweet), but once it’s hardened, it’s really what makes these taste like Girl Scout Cookies and not just chocolate peanut butter Ritz crackers.

If you’ve never heard of chocolate bark before (umm, I hadn’t), it is just a big chocolate slab that you can probably find in the baking aisle at your grocery store for $1.99. As far as I can tell, it’s just melted-down scraps from other chocolates. It also seems to have a pretty high fat content, because it stays nice and melty while you’re dipping these peanut butter Ritz sandwiches in it, which I found was not the case with chocolate chips. But if you’d rather use chocolate chips, dark chocolate, etc., I might suggest adding a bit of butter or coconut oil to it if you have trouble with the dipping.

Better Than Tagalongs (or Peanut Butter Patties) | coffeeandquinoa.com

Just look at that little tin of heaven… I really can’t emphasize enough how good these are. I thought I liked Girl Scout cookies… until I had these. I may never spend $4 on 12 peanut butter patties again.

Better Than Tagalongs (or Peanut Butter Patties) | coffeeandquinoa.com

Last but not least, I need to give a birthday shout-out to my little sister Alban, who is 19 today! Happy birthday sister! Hope you are having a wonderful start to your birthday, and that it includes real-life sweets :)

That’s all for today, folks! Happy Friday – have a great weekend!

Better Than Tagalongs (or Peanut Butter Patties) | coffeeandquinoa.com

Better Than Tagalongs (or Peanut Butter Patties)

Makes 20 cookies

Ingredients:

4o Ritz crackers

3/4 cup smooth peanut butter (I used Skippy)

8 oz. chocolate bark

sprinkles, sea salt, chopped roasted peanuts, etc. for garnish (optional)

Instructions:

First, make peanut butter and Ritz sandwiches, using almost 2 tsp of peanut butter in each sandwich.

Melt chocolate bark in the microwave in 30-second increments, stirring between each.

Dip each peanut butter Ritz sandwich in chocolate, coating completely. I like to use a fork to turn the sandwich over a few times and make sure it’s totally covered in chocolate before removing it.

Set chocolate-covered cookies on a baking sheet. (Unlined is fine.) If desired, garnish with sprinkles, sea salt, or crushed peanuts.

Place in the freezer for 10-15 minutes to firm up. Once firm, store in an airtight container at room temperature. You can also keep them in the fridge, but bring to room temperature before serving. Will keep for several days.

Time:

30 minutes

Related Posts Plugin for WordPress, Blogger...

Filed Under: Cookies Tagged With: chocolate, cookies, peanut butter, quick & easy

  • « Previous Page
  • 1
  • …
  • 52
  • 53
  • 54
  • 55
  • 56
  • …
  • 69
  • Next Page »

Welcome

Hi, I'm Erica! I'm a lover of all types of food, although I’m mostly vegetarian these days. I like salad, but I LOVE chocolate. This blog is a place where I try to balance the two.
Read More…

  • 
  • 
  • 
  • 
  • 

Subscribe via email

Get new posts delivered straight to your inbox!

Recipes by Category

Pecan Pie Rice Krispie Treats (Vegan)
Copycat Pinkberry Frozen Yogurt
Yogurt Panna Cotta with Balsamic Blueberries
fudgy chocolate pumpkin cake from coffee and quinoa
Pumpkin Maple Pecan Bourbon Ice Cream (Vegan)

Archives

my foodgawker gallery
my healthy aperture gallery
View my Tasty Kitchen Profile

Connect

Hi, I'm Erica! I'm a lover of all types of food, although I’m mostly vegetarian these days. I like salad, but I LOVE chocolate. This blog is a place where I try to balance the two.

My Ultimate Avocado Toast | coffeeandquinoa.com
Herbed Tomato Soup with Cornbread Croutons | coffeeandquinoa.com
Our Wedding - Part Two | coffeeandquinoa.com
Blueberry Kale Stem Smoothie | coffeeandquinoa.com
Shredded Kale and Brussels Sprout Salad | coffeeandquinoa.com
Our Wedding 9.20.14 | coffeeandquinoa.com
  • 
  • 
  • 
  • 
  • 

Copyright © 2025 · Coffee & Quinoa · Site Design by Heather Mackan · Built on GenesisWP